
For many kids February is a cold month where they’re often stuck indoors. Beaded safety pins are a fun kid craft that can keep them busy and the boredom away, and this heart beaded safety pin is perfect when Valentine’s Day is approaching.

Heart Beaded Safety Pin
Disclosure: This post contains affiliate links. As an Amazon Associate I earn from qualifying purchases.
Winter months become so long and boring. The weather this winter hasn’t even been all that bad, but we still seem to be trapped inside a lot.
Truly I might lose it if I hear Nick tell me he’s bored one more time. While I try to give him time to come up with ideas to alleviate his boredom I do find it helpful to have some ideas in the back of my mind.
When I was a kid and I was bored I always wanted to find new crafts to do. I can’t remember the last time I was sitting around feeling bored, but I still love to do crafts when I have time to spare.
This heart beaded safety pin craft is a wonderful option for those bored moments. It’s a very easy craft to have on hand, and best of all you aren’t left with a big mess when the craft is finished!


Supplies Needed for Heart Beaded Safety Pin
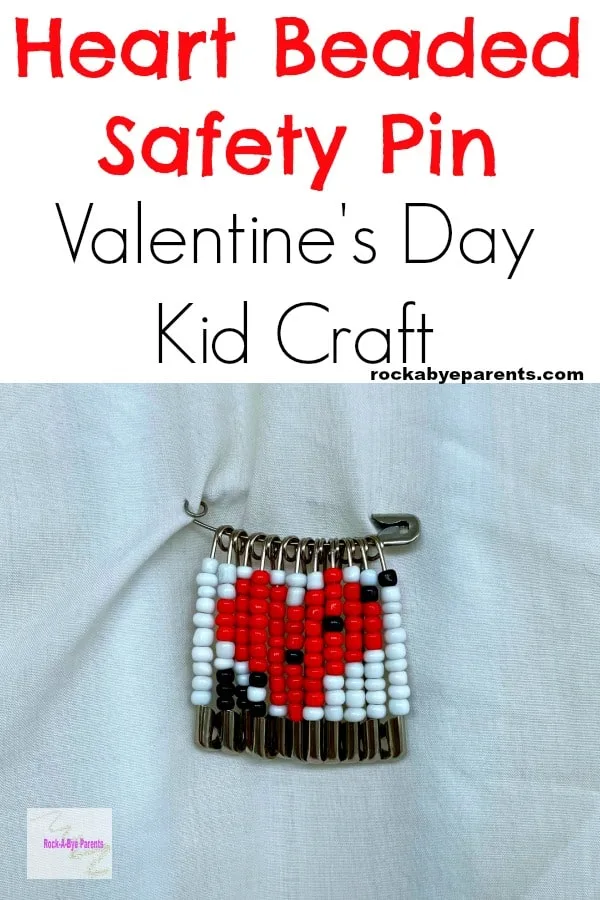
- 12 Size 3 safety pins (2″ 51mm pins)
- 6/0 Seed beads (52 red, 47 white, and 11 black)
- Butter knife
- Pliers
How to Make a Heart Safety Pin with Beads
I have been creating many new beaded safety pin designs for some time now. I have to say that this heart pin is one of my favorite designs so far. I just love how it turned out and how complete it looks. I especially love the arrow through the heart.
Before I get into the step-by-step process of putting this pin together I do want to give a sort of heads up. Many years ago I made my first bead pin, which was a flag beaded safety pin. I made it in elementary school, so to me these are a kid craft. Still this craft uses tiny beads and sharp pins, so it certainly isn’t geared for young kids. I’m sure that’s probably a given, but I always feel like I should mention that.
There is one last tip I really want to share. If you’re new to seed beads it’s important to note that they aren’t created equally. The size and shape of them can really vary from one bead to the next. This means that you’ll likely need to play around with the beads used so everything lines up correctly.
That covers the basics, so let’s get crafting
Building the Beaded Safety Pins


When I talk about the pin designs I’m going to be talking about them in the order of left to right. While the heart part of the design is a mirror image the arrow is not, so it’s important to go in the correct order.
Now when making beaded safety pins I suggest building all of the pins before working on assembling them into the final pin. Since the seed beads are often different sizes I like to put the safety pins next to each other to see how everything lines up before I waste time assembling. Otherwise I’d spend a lot of time taking the final pin apart to fix things.


The designs of the pins are as follows:
Pin 1: 10 white seed beads
Pin 2: 2 white seed beads, 3 red seed beads, 2 white seed beads, 3 black seed beads
Pin 3: 1 white seed bead, 5 red seed beads, 2 white seed beads, 2 black seed beads
Pin 4: 7 red seed beads, 1 black seed bead, 1 white seed bead, 1 black seed bead
Pin 5: 1 white seed bead, 8 red seed beads, 1 white seed bead
Pin 6: 2 white seed beads, 3 red seed beads, 1 black seed bead, 4 red seed beads
Pin 7: 1 white seed bead, 8 red seed beads, 1 white seed bead
Pin 8: 3 Red seed beads, 1 black seed bead, 3 red seed beads, 3 white seed beads
Pin 9: 1 white seed bead, 5 red seed beads, 4 white seed beads
Pin 10: 1 white seed bead, 1 black seed bead, 3 red seed beads, 5 white seed beads
Pin 11: 1 black seed bead, 9 white seed beads
Assembling the Beaded Safety Pin
While it might seem like assembling the pin would be the easiest part of the pin making process it can actually be a little tricky. This step might also require some adult help.


The first thing that needs to be done is to prepare the main safety pin that the beaded safety pins will hang from. To do this you need to open up the coil of the main pin. You don’t need to widen it a lot. You just need to open the coil enough to allow the beaded safety pins to slide over it.
I have found that the easiest way to do this is with a butter knife. Just slide the thin cutting side of the butter knife into the coil. Then pull on the knife in order to open up the coil.
Once the coil is open enough you can start adding the beaded safety pins. Start with pin 11 and continue to add the pins working down to pin 1.
To attach the beaded pins you just slide the hole of the beaded pin onto the opened side of the main pin. When you get to the opened coil just continue to slide the pin over it so it ends up on the other side of the opened pin.
Don’t worry if this sounds a bit confusing. Once you try it a few times you’ll get the hang of it. If you are unable to slide the beaded pin through the coil then just use your butter knife to open the coil a bit wider.


When you’re in the processes of attaching the beaded pins you want to make sure they are all facing the same way when you go to attach them. If they aren’t then some will be facing forward and some will be facing backwards once you’ve slid them over the coil. Then you’ll have to take the wrong facing ones off and attach them again.
The way they face, either left or right, when you attach the beaded pins is totally up to you though. I’ve done it both ways. Just depends which way I grab the first pin when I go to put it on.
Once you have attached all of the beaded safety pins you’re just about done. There is just one simple thing left to do, although it’s an important step. You just need to take a pair of pliers and pinch the coil shut. If you don’t do this then the beaded safety pins often slide back into the open coil.
When you have the coil closed you are all done and the heart beaded safety pin is ready to be worn! I hope your child has fun making it, and that it helped end the boredom blues.

